📎 Manage Attachments
The Manage Attachments panel gives you a central, cross-item overview of everything stored in your knowledge base's attachment repository — images, documents (PDF, Word, Excel, PowerPoint, plain text), and item notes. Instead of jumping from item to item to find where a specific file lives, this panel lists every stored attachment in one place and lets you attach it to (or detach it from) any item with a simple drag-and-drop.
📋 The Attachment List
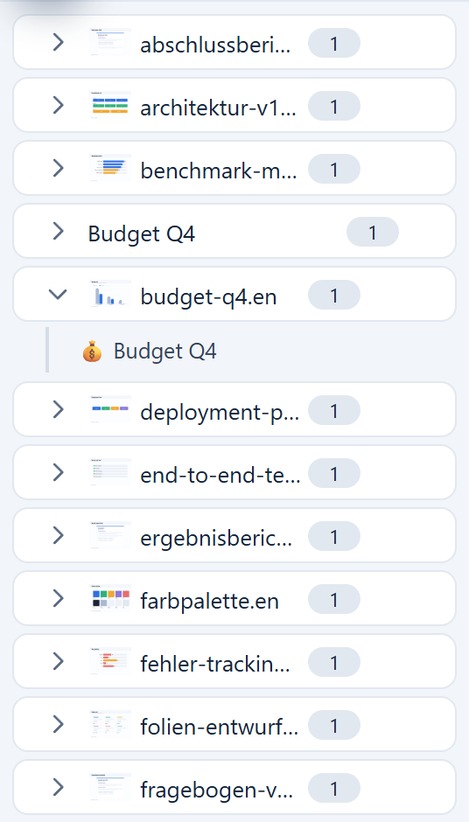
Each entry in the list shows:
- Preview: A thumbnail for images, or a small file-type icon for documents — unless a custom preview image was supplied for that file via
metadata.jsonon import (see below), in which case that image is shown instead. Entries without a preview show no icon at all. - Name, and on hover a tooltip with the description.
- Attachment count: The number on the right shows how many items (or relations) this entry is currently attached to. An entry with a count of 0 exists in the repository but is not attached anywhere yet.
Click the small ▶ arrow to expand an entry. This reveals, indented below it, every item it is currently attached to.
- Clicking one of these indented rows jumps to that item in the diagram.
- Clicking the ✕ next to an indented row removes just that one attachment link — the repository entry itself, and its other links, are kept.
- Clicking the entry's own row (collapsed or expanded) opens a full-screen preview of its content — see Viewing an Attachment below.
🗑️ Deleting Attachments
There are two different ways to delete something here, and it's important to know the difference:
- ✕ on an indented "attached to" row: Removes only that link. The file or note stays in the repository and remains attached everywhere else.
- ✕ on the entry's own row: After a confirmation prompt, this permanently deletes the entry from the repository and removes it from every item it was attached to.
You can also select one or more entries (see below) and press the Delete key on your keyboard (on the Mac and iPad Cmd+Backspace).
☑️ Selecting Multiple Entries
To delete several attachments in one step:
- Click "Select" in the toolbar to turn on selection mode — recommended on touch devices, where the "✕" is otherwise only revealed for selected rows.
- Ctrl/Cmd-click, or Shift-click for a range, to select entries directly on desktop without needing to turn on selection mode first.
- With several entries selected, click the ✕ on any one of them to delete the entire selection in one combined action (a single undo step).
The same selection mechanism also works on the indented "attached to" rows, letting you detach several items from a repository entry at once.
🎯 Attaching Items via Drag-and-Drop
To attach an existing repository entry to an item in your diagram (in edit mode):
- Click and hold an entry in the list.
- Drag it onto the target item in the diagram — a connecting line follows your cursor.
- Release the mouse button over the item.
Pro tip: If you have multiple entries selected, starting the drag from any one of the selected rows attaches all of them to the target item at once.
🖼️ Using an Image as the Diagram Background
In edit mode, hover over the row of an image: a ▨ icon appears next to the ✕. Clicking it immediately sets that image as the background of the current diagram — in the 3D view as a surrounding backdrop.
The image does not have to be attached to any item; an entry with a reference count of 0 works just as well. The route via the selection dialog is described in the chapter Formatting the Diagram.
📥 Importing New Attachments
Click Import in the toolbar to add new files to the repository without attaching them to any item yet — perfect for building up a library of documents that you attach to items later, exactly when you need them.
- Select files, drag & drop, or paste from the clipboard — the same familiar options as the "Insert Images" dialog.
- Besides image formats, you can now also import documents: PDF, Word, Excel, PowerPoint, and plain text files.
- Update existing attachments: Check this option to have the import overwrite an existing entry with the same file (matched by name, or precisely by the
urifield from ametadata.jsonfile — see below) instead of creating a duplicate. All existing attachment links are preserved when an entry is updated this way.
Attachments from Wikipedia and Wikidata
The repository does not only fill up by hand. Both the Wikipedia import and the Wikidata import (both under Edit Diagram) offer the option Import images as attachments. With it switched on the images do not go into the item name as a small preview but are fetched at a high resolution, stored here as entries of their own and attached to the respective item. They are recognised through their Wikimedia description page: importing the same articles a second time updates the existing entries instead of filling the list with duplicates.
💡 Pro Tip: Bulk-Import with metadata.json
If you select or drop a file named metadata.json together with your other files, the import dialog reads it automatically and uses it to fill in proper names and descriptions for each file — ideal for importing a whole folder of documents at once instead of ending up with raw filenames in your list.
{
    "update": true,
    "files": {
        "handbook.pdf": {
            "name": "User Handbook",
            "description": "Version 2.1, published 2026-07-01",
            "uri": "doc-handbook",
            "content": "User Handbook Version 2.1. Extracted plain text used for preview and search indexing without HTML tags...",
            "preview": "iVBORw0KGgoAAAANSUhEUgAAAUAAAAD..."
        }
    }
}
update(optional): Iftrue, matching files overwrite existing entries instead of creating duplicates.name/description: Shown in the attachment list instead of the raw filename.uri: A stable identifier used to reliably match a file to an existing entry on repeated imports — recommended whenever you plan to re-import an updated version of the same file later.content: Extracted text as plain text (strictly without HTML tags). It serves as a readable preview for document types the browser cannot render natively and is indexed for full-text searches. Important: Do not include HTML markup like<p>or<h1>, as the application's search engine (SearchDataAction) performs literal text matching and HTML tags prevent search hits on leading words.preview(optional): A Base64-encoded PNG image shown as the entry's thumbnail in the attachment list, replacing the generic file-type icon — ideal for showing an actual screenshot of a document's content instead of just its file extension.
Pro tip: Writing a metadata.json file by hand for a whole folder of documents is tedious. The create-attachment-metadata developer skill in this repository generates it automatically — including real content-based preview images (a rendered page screenshot for PDF and Office documents where possible, or a text-excerpt preview card otherwise) and text extraction from a wide range of file types.
👁️ Viewing an Attachment
Clicking an entry's row opens the document preview:
- Docked Preview vs. Full-Screen: If there are at least 500 pixels of free viewport width remaining to the right of any open side panels, the preview docks seamlessly into the right side of the screen. This allows you to interact with the diagram and side panels simultaneously. On smaller screens, the preview opens as a full-screen overlay.
- Images: Open with pan and zoom capabilities.
- Keyboard Shortcuts in Image Preview:
- Ctrl+Mouse Wheel: Fine-grained zoom (10% per tick).
- Ctrl++ / Ctrl+-: Zoom in or out (25% per step).
- Ctrl+0: Fit image neatly to preview window dimensions.
- Ctrl+1: Display image at 100% original pixel size.
- Keyboard Shortcuts in Image Preview:
- PDF files: Render directly inside the integrated viewer.
- Notes: Display with the same rich formatting as in the Notes on Item panel.
- Other document types: (e.g., Word, Excel) show a placeholder or the extracted plain text — click the open icon in the top-right corner to launch the original file on your device.
Close the preview with the ✕ icon in the top-right corner.