🗒️ Whiteboard
On a whiteboard, cards stay exactly where you put them. It is meant as an intermediate step: first you collect thoughts as unconnected cards, later you connect them and turn the result into a diagram.
The difference from the layouts: a layout arranges your items automatically. On the whiteboard you decide the arrangement yourself, and nothing moves on its own.
You can keep several whiteboards in one knowledge base — one per topic, say, or one per stage of work. Each whiteboard shows only its own cards.
⚠️ Prerequisite: Edit mode must be active. You can view an existing whiteboard in browse mode as well, but you cannot create one, rename it or add cards to it.
🚪 Creating, switching and leaving whiteboards
Click Tools in the left main menu. There you will find:
- New whiteboard — creates another, empty whiteboard and opens it straight away. The very first time, this is also the way to your first whiteboard.
- Rename whiteboard and Dissolve this whiteboard — the two commands for the whiteboard you are currently on. They are not there while you are outside a whiteboard.
- Turn this diagram into a whiteboard — the counterpart to dissolving, see Turning a diagram into a whiteboard further down. It only appears outside a whiteboard.
- Whiteboards — a section listing nothing but the existing whiteboards. The current one is marked, clicking another one switches to it.
So all commands sit below one another in the panel, and the section below them is a plain list. The first time you open the panel, it expands by itself and fetches its contents.
When creating a whiteboard, the application adds an invisible element that holds it together. You never see it and do not need to care about it.
There are two ways out, and they lead to different places:
- The × in the whiteboard toolbar at the top right shows the same whiteboard as an ordinary diagram in the layout you used last. You keep the same cards, only arranged differently. The toolbar stays in place and offers Show as whiteboard at the same spot — one click, and every card is back in its place.
- The back arrow next to it takes you back to the diagram you entered the whiteboard from. It only appears when there is such a diagram — that is, after you have opened a whiteboard from a diagram during this session. After Turn this diagram into a whiteboard it is missing: the diagram has become the whiteboard itself.
Clicking the whiteboard you are already on in the list does the same: it deselects the whiteboard and returns you to where you came from. This helps especially after an accidental New whiteboard — the new whiteboard is empty, and without this way back you would have to find your diagram again through the search.
The layout selection under Adjust View stays available on the whiteboard; no entry is marked there. Choosing a layout leaves the whiteboard and shows it as a diagram in that layout — a third way out.
The mode is stored: the next time you open the knowledge base, you are back on the whiteboard you used last.
It ends automatically as soon as the whiteboard is no longer being shown — for example when you jump to an item outside it via the search, or load a different knowledge base. You then end up in the layout you used last.
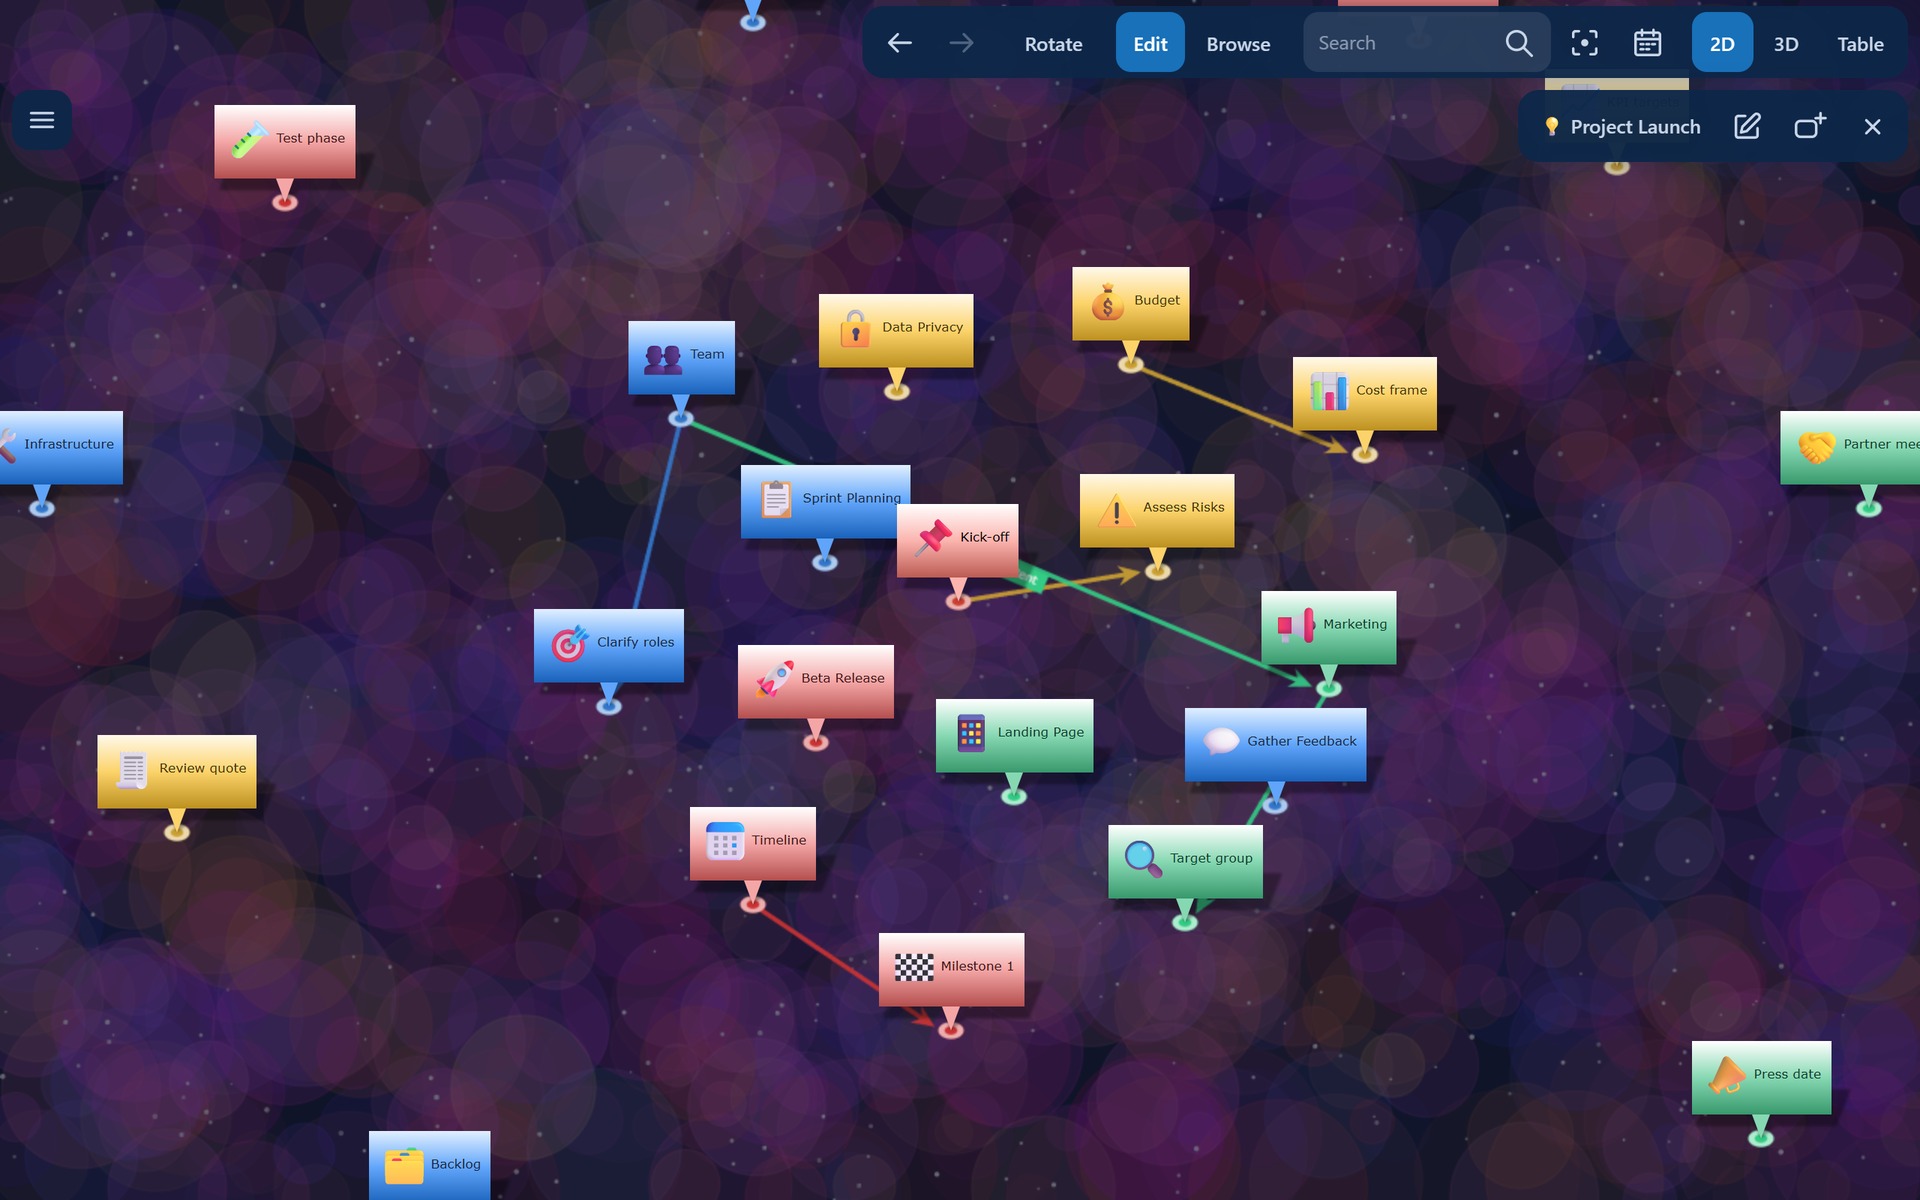
🧰 The whiteboard toolbar
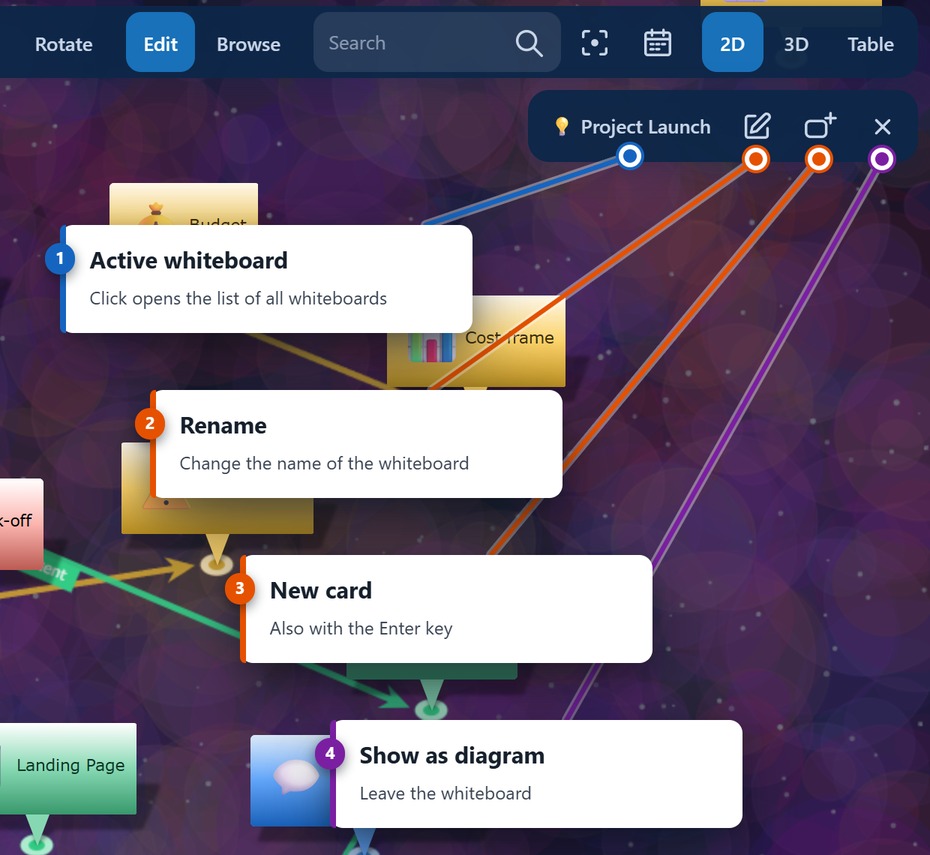
While a whiteboard is active, a toolbar of its own appears at the top right. On the far left it carries the name of the whiteboard — with several whiteboards, this is where you read off which one you are on. Next to it are up to four buttons:
| Button | Effect |
|---|---|
| Rename whiteboard | Opens the whiteboard's edit dialog — the same as the entry in the panel |
| New card | Creates a card in the centre of the visible area |
| Back to the previous diagram | Leaves the whiteboard and loads the diagram you entered it from |
| × | Shows the same whiteboard as a diagram |
Rename and New card only appear in edit mode, because they write data. The back arrow only appears while the application knows a previous diagram. The name and the × stay in browse mode as well. Once the × shows the whiteboard as a diagram, the toolbar only carries the name and Show as whiteboard.
The usual quick access toolbar above it stays in place — search and view switching remain available. Its centre button brings all cards back into view while you are on a whiteboard, which helps when you have scrolled away.
✏️ Naming whiteboards
New whiteboards are called "Whiteboard", "Whiteboard 2", "Whiteboard 3" and so on. As soon as you keep more than one, a meaningful name pays off: it appears in the toolbar and in the list in the Tools panel. In the diagram view the whiteboard is the root item under this name.
To rename, click Rename whiteboard — either in the toolbar or in the panel. The familiar edit dialog opens; change the Name field there.
🆕 Creating cards
There are five ways that create no connection:
- Double-click on an empty spot — the card appears exactly where you clicked. The quickest way.
- New card in the whiteboard toolbar or New in the Edit Diagram panel — the card appears in the centre of the visible area.
- Dragging from a card's drag handle onto an empty spot — the card appears at the drop point.
- Enter key — when nothing is selected, the card appears in the centre of the visible area.
- Shift+Enter (Shift+Enter) — when a card is selected, the new card appears below it, otherwise in the centre of the visible area.
One more way connects the new card right away:
- Tab (Tab, on Windows also Ins) — when a card is selected, the new card appears to its right, connected to the selected card.
On a whiteboard that is still empty, the welcome card opens first. Collapse it with its cross, and only the Create New Item button remains in the middle, with the hint about the double-click gesture below it. Both disappear as soon as the first card is there; on whiteboards that already hold cards the hint does not appear.
In every case the familiar Create New Item dialog opens, right next to the spot where the card appears. If you pin it, you can create several cards in a row; they are then staggered so they do not cover each other.
A card you have just created is selected — you can move it straight away or create the next one with Tab or Shift+Enter. The arrow keys take you from card to card (see Keyboard Shortcuts).
💡 Tip: Cards are ordinary items of your knowledge base. They have descriptions, notes, attachments and categories like any other item and show up in the search.
🔗 Connecting cards
Hover over a card: a green drag handle appears on it. Drag it onto another card. You do not need to click the card first. This creates a real connection with name, direction and category — the same one you get in any diagram — without a dialog.
Important: Connecting moves nothing. Both cards stay where they are, only the line is added. Deleting a connection moves nothing either.
If you drag onto an empty spot instead, a new, unconnected card appears there. On the whiteboard the drag handle therefore has exactly one job: connecting cards.
📌 Moving cards
Click a card and drag the blue handle with the cross that appears below it. The card stays where you release it. The handle only appears on the selected card; hovering alone does not show it.
This is the only way a card that has already been placed will move. Everything else — connecting, disconnecting, creating new cards — leaves the existing cards untouched.
When you create or move cards, the picture as a whole may shift a little, because the drawing area grows with the cards. The cards keep exactly the arrangement you gave them.
Each whiteboard remembers the positions of its cards separately.
♻️ Dissolving a whiteboard
If you have finished working on a whiteboard and want to start a new one without losing what you built, choose Dissolve this whiteboard.
Nothing is lost in the process: the cards and all connections stay unchanged in the knowledge base. Only the whiteboard as such disappears — the invisible element becomes an ordinary item and keeps holding your cards together. You can find it again through the search or the category panel; give it a meaningful name beforehand and you will recognise it later.
Afterwards, use New whiteboard to start a fresh, empty whiteboard.
💡 Tip: If you no longer need the old collection at all, you can delete the dissolved item as well. Make sure your cards are connected to each other — otherwise cards standing on their own will only be reachable through the search afterwards.
🔄 Turning a diagram into a whiteboard
The other way round: you have an ordinary diagram in front of you and want to arrange its items by hand. Open Tools and choose Turn this diagram into a whiteboard.
The diagram's root item becomes the invisible element that holds the whiteboard together, and everything reachable from it becomes a card. The cards stay exactly where the layout had put them — from then on nothing moves on its own any more.
The command only appears where there is something to convert: outside a whiteboard, and as long as the root item is not a whiteboard already. It is the exact reverse of Dissolve this whiteboard, and that command undoes it again.
Taking it back: the card positions are stored together with the conversion — a single Undo restores the diagram. Later, once you have worked on the whiteboard, Dissolve this whiteboard takes the whiteboard back without touching your cards and connections.
What happens to the connections: the root item's connections to its neighbours are not drawn on the whiteboard — cards are meant to look independent there. They are not lost: dissolving the whiteboard, or the ×, brings them back.
➡️ From whiteboard to diagram
Once your collection has taken shape, leave the whiteboard using the ×. The same items and the same connections then appear in the layout you selected — as a mind map, flowchart, network or in the 3D view. A connection you drew between two cards becomes a level of the hierarchy there.
Your whiteboard positions are not lost. When you come back via Show as whiteboard, everything is where you left it.
In the diagram, the element holding the whiteboard together becomes visible as well; it forms the centre there and carries the whiteboard's name.