📝 Notes on Item
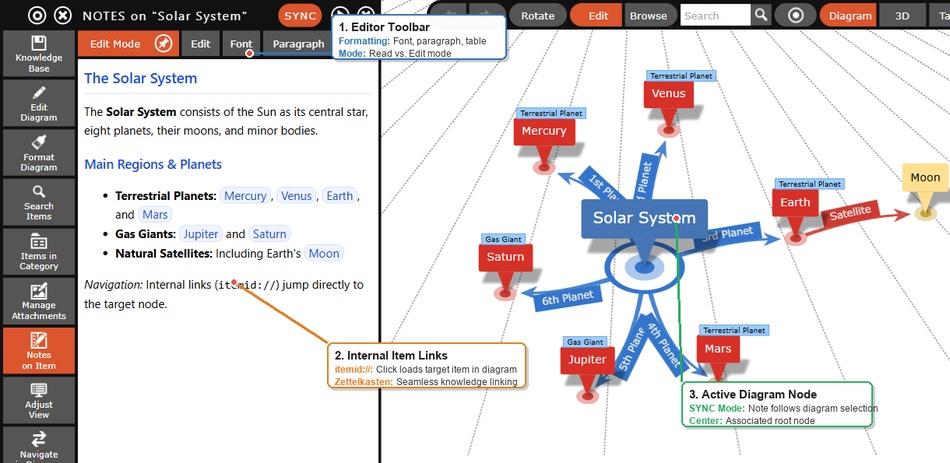
The Notes on Item menu is your integrated text editor for in-depth knowledge. Every item (every node) in your mind map can hold an extensive HTML text note – including formatted text, tables, formulas, and hyperlinks.
The notes view has two main states: A pure Read View where the note is displayed formatted and interactive elements can be used, and an Edit Mode for writing and adjusting the content.
🎛️ Header & General Control
At the very top of the notes window, you will find the global control functions for the currently opened note: The window opens to the left of the sidebar and shows the note of the selected item; its header shows the item's name.
- SYNC: Couples the notes window to the selection in the diagram – in 2D as well as in 3D. Select another item and the window shows its note right away. SYNC is switched on whenever a database is opened.
- Close (X symbol): Closes the text notes window and returns you to the full diagram view.
Adjusting the width of the window
You set the width of the notes window steplessly at its right-hand edge: grab the edge and drag it to the right or to the left. A small handle sits in the vertical middle of the edge for this, but you can just as well grab any other spot along the edge. As soon as you hover over it, the edge changes colour and the pointer turns into the resize symbol. This is particularly useful for giving yourself more space on the screen when writing or reading long texts.
The width you set is remembered as a percentage of the window width. It is therefore still there the next time you open the panel, and it keeps its proportion when you resize the application window or rotate the device.
⚙️ File & Display Options
In this section, you control the basic behavior of the note view:
- Save note: Manually saves your current text inputs to the database. Leaving Edit Mode (clicking Edit Mode) also saves the note; note changes can be undone like any other change.
- Save automatically (Switch): Pro tip: Activate this option so that the system saves every text change fully automatically in the background while you type.
- Delete note: Irrevocably deletes the entire content of the current text note after a security prompt.
- Keep Edit Mode (pin on the Edit Mode button): By default, already filled notes are opened in pure Read View. On tablets and smartphones, this prevents the on-screen keyboard from accidentally popping up when just reading or highlighting. Click the pin in the corner of the Edit Mode button if you want the note field to always be in the writable Edit Mode immediately when opening an item; another click releases it. Regardless of this option, an empty note accepts text right away – the Edit Mode toolbar appears without pressing the button.
✏️ The Edit Mode (Edit Toolbar)
When you activate the Edit Mode, a multi-part toolbar becomes visible, which can be operated like a classic word processor.
📝 Edit Text
This submenu contains general tools for the document:
- Undo / Redo: Undoes or re-applies the last input. The text field keeps its own history: continuous typing is one step, every command (format, table, paste) is a step of its own. The history starts when the note is loaded, so Undo never brings back the text of another note.
- Find and Replace: Shows a search bar at the bottom right of the text field (Ctrl+F, with replace Ctrl+H; Mac Cmd+F / Cmd+Alt+F). It shows "1 of 4", finds words across formatting boundaries and can match case. Replace All is a single undo step. Finding also works in the read view.
- Insert Images: Opens a dialog to upload or insert images into your note. You can often determine alignment and size here as well.
- Insert Formula: Inserts a placeholder for complex mathematical formulas, which the system then displays graphically correctly.
- Insert Hyperlink / Remove Hyperlink: The Insert Hyperlink dialog has two fields: URL for an internet address and Hyperlink to a diagram item for a link to an item of the same database. In the second field a few letters of the name are enough; the chosen suggestion enters the address
itemid://…with the correct ID. If a word is selected beforehand, that word becomes the link; without a selection the dialog inserts the chosen item's name as link text. Remove Hyperlink turns an existing link back into plain text. - Links to other items (
itemid://): A hyperlink does not have to point to the web. If you enter an address of the formitemid://71, the link points to the item with that ID inside the same database.- Intelligent Navigation Semantics: Clicking such a link checks visibility first: if the target item is already visible in the current diagram, it is focused and selected in 2D or targeted by the 3D camera — the diagram remains stable and is not reloaded. Only if the target item is currently out of view does the app load it as the new root node. If the option Always Load Target is switched on under Navigate in Diagram, the target always becomes the new root instead – even if it is already shown in the diagram.
- Controls in Edit Mode: In read-only mode, a standard click follows the link immediately. In active text edit mode, a single click places the text cursor so you can edit the anchor text; to follow the link while writing, hold Ctrl (or Cmd on macOS) and click the link.
- Where the ID comes from: Item IDs are not shown in the user interface – and you do not need them, because the item selection in the Insert Hyperlink dialog fills them in. A JSON export lists them under
nodes[].id(see Knowledge Base); the Obsidian import creates such a link for every[[Wikilink]]of the vault automatically. Caution with JSON import: the application takes notes over verbatim but gives the imported items new IDs. Anitemid://4from the import file then points to some other item of the database. Create links after the import, through the dialog. - Broken links are harmless: A reference to an item that does not exist is not an error — the link simply falls back to ordinary link behaviour.
- Insert Horizontal Line: Inserts a visual separator line into the text.
- Spell Check: Activates or deactivates your browser's automatic spell checker for this text field.
- HTML Source: Switches to the pure HTML code view of the note (formatting tools are deactivated here). This is particularly useful for professionals who want to adjust the layout in detail.
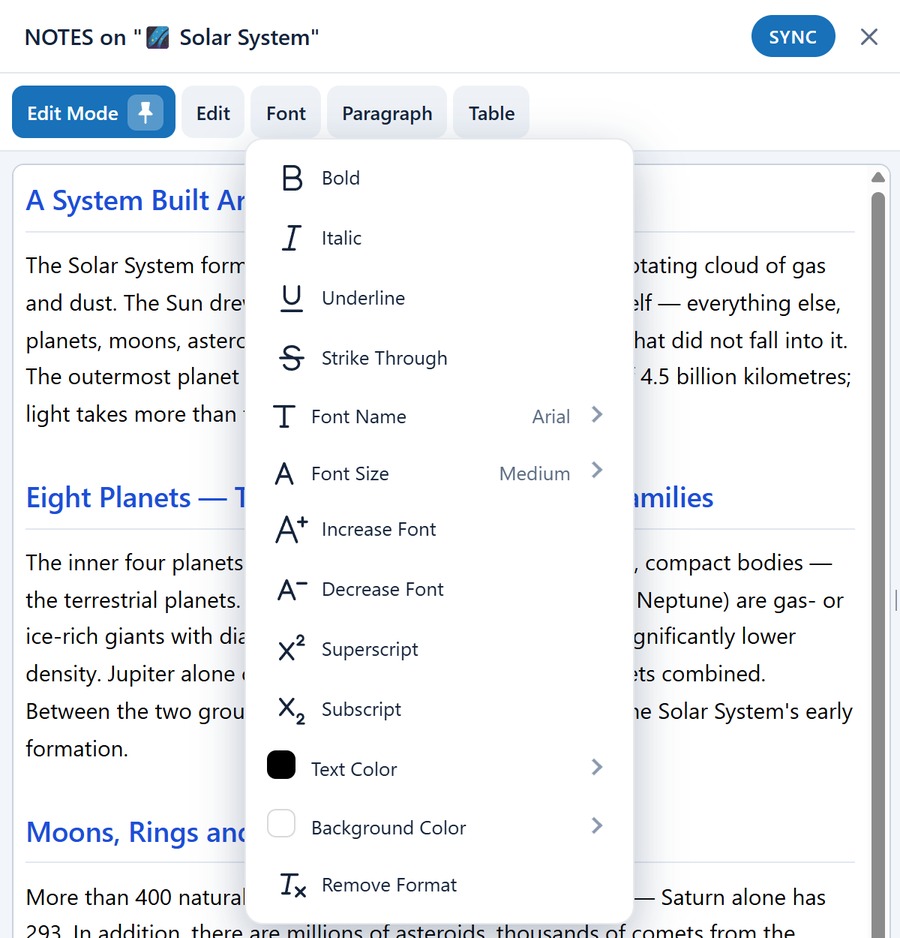
🔤 Format Font
Here you adjust the appearance of individual words or sentences:
- Font Style: Format text as Bold, Italic, Underline or ~~Strike Through~~.
- Font Name & Font Size: Select the desired font or adjust the size (Increase Font / Decrease Font) in single steps.
- Superscript / Subscript: Useful for formulas or footnotes (e.g., H₂O or x²).
- Text Color & Background Color: Highlight selected text with colors from the palette.
- Remove Format: Deletes all special style settings of the selected text and resets it to the default.
📑 Format Paragraph & Edit Table
Tools for structuring layout and lists:
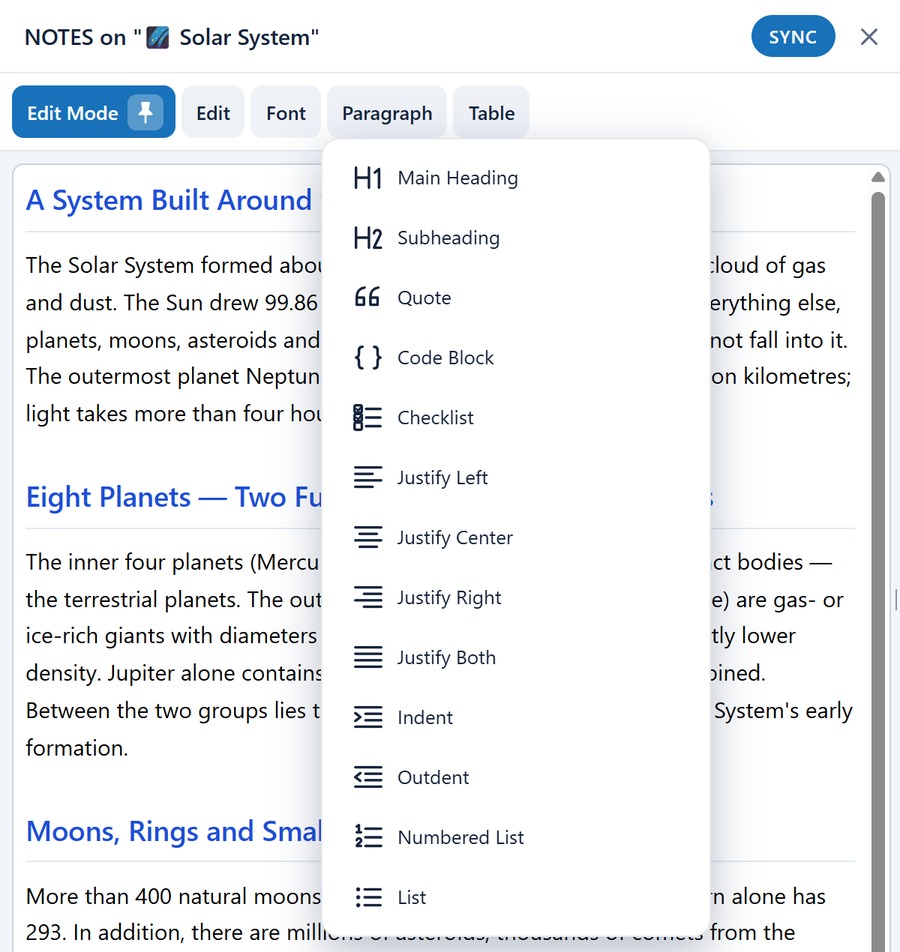
- Headings: Format paragraphs as "Main Heading" or "Subheading".
- Alignment & Indent: Align text Justify Left, Justify Center, Justify Right or Justify Both and use the "Indent" or "Outdent" commands.
- Lists: Create a "Numbered List" or an unnumbered "List" (bullet points). Tab indents a list item, Shift+Tab outdents it.
- Quote, Code Block, Checklist: A Quote is indented with a line at the edge, a Code Block uses a monospaced font on a grey background. In a Checklist, a click on the box ticks the item off; Enter starts a new, open item.
- Edit Table: Insert new tables and manage them using commands like "Insert Row Above"/"Insert Row Below", "Delete Row", "Insert Column Left"/"Insert Column Right" or "Delete Column". There are also Header Row On/Off, Merge Cells (the selected cells become one) and Split Cell. A new table is inserted as a block of its own at the cursor, with the cursor in the first cell. Tab moves to the next cell; in the last cell it adds a new row.
- Column width: Move the mouse onto a column border until the pointer becomes a double arrow, then drag. An inner border shares the width between the two neighbouring columns; the right edge makes the whole table wider or narrower. Widths are stored as percentages, so they adapt to the window width.
✨ Writing Aids
These features apply to every text field of the application – in the note as well as for name and description in the Edit Item dialog.
- Floating format bar: As soon as you select text, a small bar with the most common formats appears right next to it (bold, italic, underline, strikethrough, increase font, decrease font, text color, highlighter, heading, list, hyperlink, remove formatting). Text color and Highlighter open a row of colors right below the bar; a tap on a color colors or highlights the selection, No color removes it again. In names, descriptions and relation labels, highlighted text also gets dark lettering – otherwise the white text in the colored diagram box would be unreadable on the light marker. On smartphones and tablets it sits below the selection so it does not cover the system menu (copy, paste). When the cursor is in a table, a second bar shows the table commands. The bars disappear while you type and with Esc.
- Formatting as you type: At the start of a paragraph,
#,##,-,*,1.,>,```and[]– each followed by a space – turn the paragraph into a heading, subheading, list, numbered list, quote, code block or checklist. Undo right afterwards restores the typed characters. - Link to an item with
[[: Type two square brackets to open an item picker. The chosen name is inserted as anitemid://…link; with Esc the brackets stay as normal text. - Clean pasting: Text from Word, Google Docs, e-mails or web pages keeps its headings, lists, tables, bold, italic and links. Whatever only gets in the way in a note is dropped: foreign fonts, page margins, scripts, forms, buttons and invisible white text from dark views. With Ctrl+Shift+V (Mac Cmd+Shift+V) you paste the text without any formatting.
- Pasting and dragging images: A screenshot from the clipboard, or image files dragged into the text field, are embedded directly in the note – at the cursor or where you drop them. Large photos are reduced to 1600 pixels wide to keep the database small.
- Keyboard shortcuts: The complete list is under Keyboard Shortcuts.
Note on the Windows edition with the Internet Explorer engine: It has no floating bars and no column-width dragging; Ctrl+S and Ctrl+Y act on the database instead of the text field.
⚡ Actions (Automations)
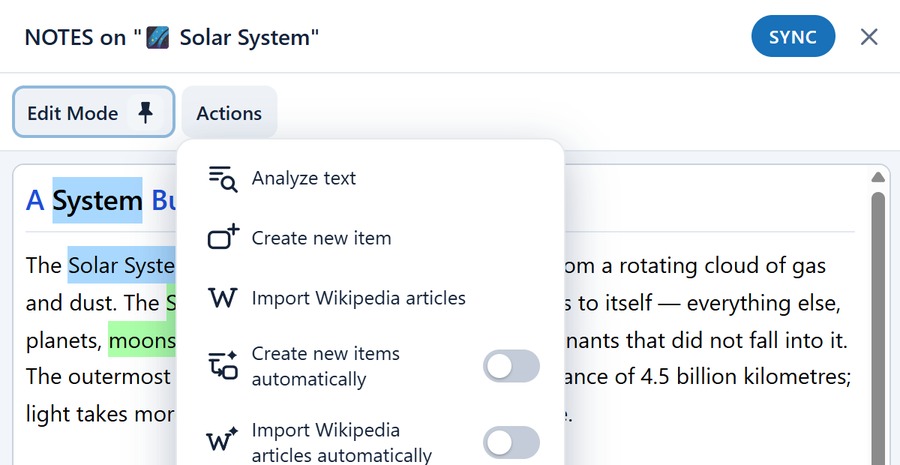
Important Note: The Actions button is only displayed when Edit Mode is switched off (i.e., you are in the pure Read View).
Its menu transforms the notes view into an ingenious tool for knowledge workers. Here you will find automations that allow complex diagrams to virtually build themselves just by reading texts.
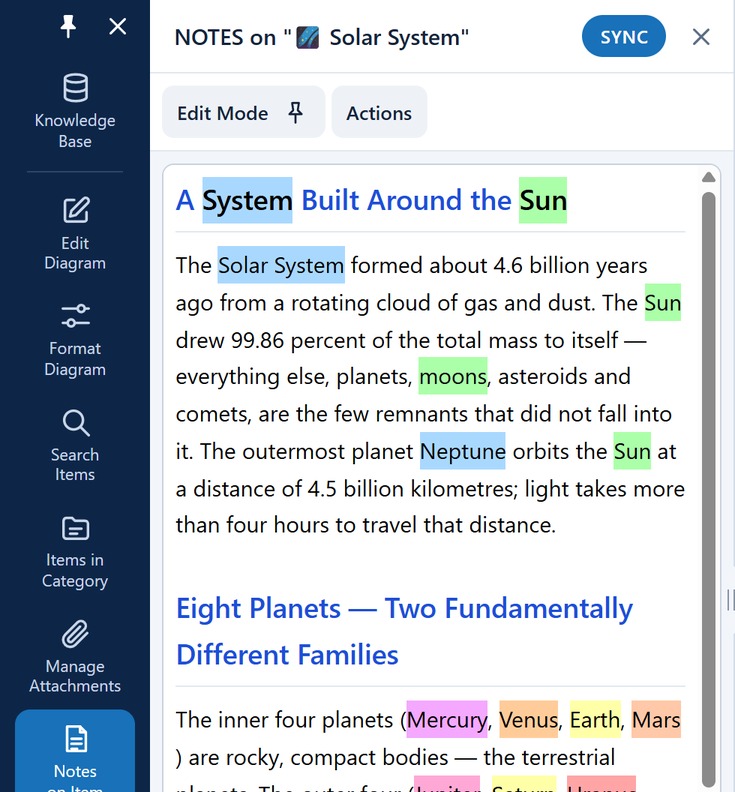
- Highlight item names (Switch): Automatically searches the continuous text of your note for words that already exist as nodes (items) in your current diagram and highlights them in color. Each name appears in the lightened color of its item; text inside links is not marked. Hovering over a marked name or clicking it shows a tooltip with the item's name and description. Highlighting is switched on when the application loads.
- Analyze text: Analyzes the entire text of the current note for frequent and relevant key terms and fully automatically generates a networked mind map from it, with the respective original sentences from the text stored as new notes on the created nodes.
- Import Wikipedia articles: Highlight a word to search directly for the matching Wikipedia article and create it as a new item.
- Create new item: Select a term in the note and choose this entry: the term becomes a new item without any further dialog – as a child of the item whose note is open. The sentence containing the term becomes its description. The term then appears highlighted in the note.
- Create new items automatically (Switch): The most ingenious feature for quick research! If this is activated, every word or sentence you highlight in the note is immediately and fully automatically turned into a new node item in the diagram.
- Import Wikipedia articles automatically (Switch): With every text highlighting, automatically tries to load the matching Wikipedia article in the background and add it to the project.
- Import Webpage when link is clicked (Switch): If you click on a hyperlink in the note, the target webpage is read directly and its content imported as a new diagram item instead of opening it in a separate browser window.